Saturday, May 12, 2012

Teacher Gifts

The finished gift
The kids have just finished preschool, and I was trying to come up with some good teacher gifts.  One of my favorite things that I received from students was Christmas ornaments; I think of each student as I put them on the tree every year.  Of course, Christmas ornament crafts are hard to come by in May.  

I headed to Michael's to see what might be available.  I'm happy with how these gifts turned out, so I thought I would share the ideas!

Stickers made a perfect addition to the top of the box
First, I bought each teacher a small acrylic box (which happened to be on clearance). I bought a package of monogram-sized letters to put on top, and what I thought were raised stickers for the front.  They were actually clear stamps, and they adhered really well to the acrylic (and can be moved around). 

Clear stamps (see link) can  be moved around on the acrylic


I trimmed the edge with pink ribbon, which I hot-glued on.  It might have been smoother if I'd used Elmer's, but I wanted to make sure it would stay.

 For the ornaments, I bought sweet little wooden shapes (already painted) that they had for about 50 cents each.  I just hot-glued a small ribbon to each to use as a hanger and there you go, sweet little Christmas ornaments.  I put a verse on each one, the year, and a little message from each kid, along with a picture.
Jack is a "Puddle Jumper," so these little frogs seemed like a perfect memento for his teachers

I added tiny photos on regular paper to the back; made it very personal
I chose crosses for Lily's teachers and wrote a verse and the year on the back.
A few kisses provided a nice filler

 
Five gifts for around $30; I really liked how they turned out!

Monday, November 7, 2011

Paint chip turkeys


I had grabbed a few paint samples the last time I was at Walmart.  (Side note: I probably should have asked if they had any discontinued paint chips I could have, rather than just taking a few of each color.  My kids ask for paint samples every. single. time. we got to Walmart, and they never seem to care, so I didn't think of it.  But it's probably good to ask, and don't ever clean them out.)

So, I've been looking for some colorful uses for them.  We've already done Christmas trees, which are DARLING.  Then I saw a pin for these turkeys, and knew what our next craft would be.

(Okay, so they're peacocks, not turkeys.  Close enough.  You could add a red waggle to make them more turkey-like.)

I painted a paper towel tube a couple of days ago and let it dry.  You could have your kids do that part, but it will take a while to dry.  You could also glue scrapbook paper to the tube; how cute would that be?  Anyway, we started with two painted tubes (I cut the paper towel tube in half.)

Fan out the paint samples; glue the layers of samples together at the bottom.  

Run a line of glue on the back of the paper tube.  Glue it to your "feathers."
Add a beak and some google eyes, and you're done!

Lily insisted that hers needed a pink tutu, so there you go. :)


Pumpkin Seed Tree

A few days ago we painted some of the pumpkin seeds we'd scooped from our Halloween pumpkins.  They were dry, so today we used them for a Pumpkin Seed Tree craft.

I cut the trees freehand from construction paper; the kids glued their pumpkin seed "leaves" all over the trees.

Simple crafts are good.


Color by number/letter

A few days ago I printed some turkey color-by-letters (O=orange, etc.).  They were pretty ambitious for my kids, and though they each colored in a few spaces, they lost interest pretty quickly.  So, when I found this color-by-number, I thought it might be better.  It was, but they're still not interested in coloring the whole turkey!  I think it's good to try new things; we'll probably revisit color-by number in a few weeks.  Or I may just try some simpler ones here.

Saturday, November 5, 2011

Suncatchers


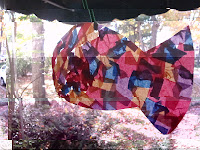
I love clear contact paper. I use it to laminate papers, and today Lily and I made some fun suncatchers.

In the original post, the teacher taped the contact paper to the table.  Definitely would do that for a room full of kids if this was an independent center activity.  But I didn't have tape on hand (painter's tape, that is, or masking tape).  I found that the static made the contact paper stay pretty well on the table, but for Jack, the loose contact paper was too hard to work with.    

We laid squares of tissue paper on the contact paper.  For Lily's I just folded it over because there was a lot of space between the pieces of tissues, so it would stick together.  I laid another sheet of contact paper over mine because the pieces of tissue were close together.

Once we had contact paper on both sides, I cut them into fish shapes and we put them up with pipe cleaners.  Fun little project!

Pumpkin Seed Pictures

We painted some pumpkin seeds today, to use in a later craft.  Not sure that tempra paint was the best choice, but that's what we have.  I'll post pictures of that when we do the craft next week.

In the mean time, we had tons of extra pumpkin seeds, so I armed each kid with glue and construction paper and we made pictures with pumpkin seeds.  Lily and Jack made up stories to go with their pictures.  Then they came and helped me make a turtle out of pumpkin seeds.  They really liked my turtle, and Lily decorated it with pictures and our family's names.  It was fun to do a craft alongside them and have they tell me all their thoughts on turtles.


Clothespin Games

I mentioned these games when we first made them; I'm bringing them back with a couple of ideas of how to use them.

First, we have our set of clothespins numbered 1-12, and two strips of cardstock with sets of dots.  The goal is to match the clothsepin with the corresponding number of dots.  Today I gave on strip to Lily and one to Jack, piled all of the clothespins in the middle, and their goal was to find their clothespins and pin them.  Not "first"--we weren't making it a contest, and they helped each other find their clothespins.  
 
Next we took our set of alphabet letter clothsepins  and piled them in the middle of the table.  I gave each child a sight work, and he or she had to find all of their letters and pin them to the word card.  They worked together on this one, too ("I need R!  Where is R?!") and it was a fun game.  They actually kept playing for a while without me, though they like me helping to find the clothespins.


Happy with both of these games!