Monday, November 7, 2011

Paint chip turkeys


I had grabbed a few paint samples the last time I was at Walmart.  (Side note: I probably should have asked if they had any discontinued paint chips I could have, rather than just taking a few of each color.  My kids ask for paint samples every. single. time. we got to Walmart, and they never seem to care, so I didn't think of it.  But it's probably good to ask, and don't ever clean them out.)

So, I've been looking for some colorful uses for them.  We've already done Christmas trees, which are DARLING.  Then I saw a pin for these turkeys, and knew what our next craft would be.

(Okay, so they're peacocks, not turkeys.  Close enough.  You could add a red waggle to make them more turkey-like.)

I painted a paper towel tube a couple of days ago and let it dry.  You could have your kids do that part, but it will take a while to dry.  You could also glue scrapbook paper to the tube; how cute would that be?  Anyway, we started with two painted tubes (I cut the paper towel tube in half.)

Fan out the paint samples; glue the layers of samples together at the bottom.  

Run a line of glue on the back of the paper tube.  Glue it to your "feathers."
Add a beak and some google eyes, and you're done!

Lily insisted that hers needed a pink tutu, so there you go. :)


Pumpkin Seed Tree

A few days ago we painted some of the pumpkin seeds we'd scooped from our Halloween pumpkins.  They were dry, so today we used them for a Pumpkin Seed Tree craft.

I cut the trees freehand from construction paper; the kids glued their pumpkin seed "leaves" all over the trees.

Simple crafts are good.


Color by number/letter

A few days ago I printed some turkey color-by-letters (O=orange, etc.).  They were pretty ambitious for my kids, and though they each colored in a few spaces, they lost interest pretty quickly.  So, when I found this color-by-number, I thought it might be better.  It was, but they're still not interested in coloring the whole turkey!  I think it's good to try new things; we'll probably revisit color-by number in a few weeks.  Or I may just try some simpler ones here.

Saturday, November 5, 2011

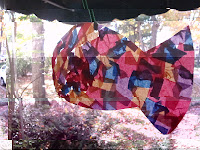
Suncatchers


I love clear contact paper. I use it to laminate papers, and today Lily and I made some fun suncatchers.

In the original post, the teacher taped the contact paper to the table.  Definitely would do that for a room full of kids if this was an independent center activity.  But I didn't have tape on hand (painter's tape, that is, or masking tape).  I found that the static made the contact paper stay pretty well on the table, but for Jack, the loose contact paper was too hard to work with.    

We laid squares of tissue paper on the contact paper.  For Lily's I just folded it over because there was a lot of space between the pieces of tissues, so it would stick together.  I laid another sheet of contact paper over mine because the pieces of tissue were close together.

Once we had contact paper on both sides, I cut them into fish shapes and we put them up with pipe cleaners.  Fun little project!

Pumpkin Seed Pictures

We painted some pumpkin seeds today, to use in a later craft.  Not sure that tempra paint was the best choice, but that's what we have.  I'll post pictures of that when we do the craft next week.

In the mean time, we had tons of extra pumpkin seeds, so I armed each kid with glue and construction paper and we made pictures with pumpkin seeds.  Lily and Jack made up stories to go with their pictures.  Then they came and helped me make a turtle out of pumpkin seeds.  They really liked my turtle, and Lily decorated it with pictures and our family's names.  It was fun to do a craft alongside them and have they tell me all their thoughts on turtles.


Clothespin Games

I mentioned these games when we first made them; I'm bringing them back with a couple of ideas of how to use them.

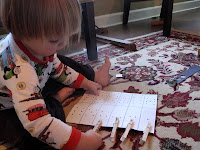
First, we have our set of clothespins numbered 1-12, and two strips of cardstock with sets of dots.  The goal is to match the clothsepin with the corresponding number of dots.  Today I gave on strip to Lily and one to Jack, piled all of the clothespins in the middle, and their goal was to find their clothespins and pin them.  Not "first"--we weren't making it a contest, and they helped each other find their clothespins.  
 
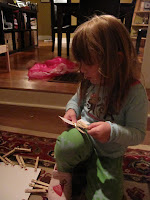
Next we took our set of alphabet letter clothsepins  and piled them in the middle of the table.  I gave each child a sight work, and he or she had to find all of their letters and pin them to the word card.  They worked together on this one, too ("I need R!  Where is R?!") and it was a fun game.  They actually kept playing for a while without me, though they like me helping to find the clothespins.


Happy with both of these games!

Paint Sample Christmas Trees

Last night we had "Girls' Time Out" at our church--we shared appetizers and recipes, chatted, made some Christmas ornaments. Well, I LOVED the ornaments we made. We made paper Finnish Stars, which were pretty hard. We made fabulous chipboard birds which we decorated with scrapbook paper and glittery accents. But the one I brought home for my kids to try was this: paint sample Christmas trees.


One note: Please don't go clean out the paint store of their paint samples.  You might ask whether they have any that have been discontinued, or if you can have a few.  Seems to me they really don't care, but you don't want to wipe them out of green!

All you need:
A few paint sample strips demonstrating shades of green (one per ornament)
Brown and yellow paint chips (for the trunk and star on top--you probably only need one of each)
Star punch (or cut star free hand)
Strip of ribbon for hanger
Decorations to glue on. We used buttons at church; for my kids, foam ornament shapes that came out of a Christmas foam craft I'd tucked away.

Glue (we used a glue gun with the buttons at church, but white glue worked just as well for the lighter decorations)

To make the craft:

1) Cut a triangle from the green paint sample. I used one of the white lines that separated the green swatches as my bottom line of the triangle, and then cut a nice tall triangle.  (Lily cut her own; I just drew a line to cut along on the back of the paint swatch.)

2) Cut a brown tree stump from your brown swatch

3) Punch a star from a yellow (or light green) swatch--you could also cut freehand or use a foam star or other decoration instead

4) Have your kids glue the star at the top of the tree (Lily then embellished hers with foam stars)

5) Then glue the stump at the bottom

6) Decorate

7) When you are finished, loop a ribbon and glue to the back of the ornament, right behind the star.

Cute, easy, fun!

Saturday, October 29, 2011

Handprint Turkey

Lily had been asking for about two hours to do a turkey craft, but I didn't feel like pulling out the paint so I couldn't find one on Pinterest to fit the bill. (Though I did find other crafts that used elements of this one, because hey, this is glue and construction paper, not rocket science.)

So, I decided that instead of making paint handprints, we'd trace the hands and turn this into a construction paper and glue craft.

I traced the kids' hands on orange construction paper (How do we have NO brown construction paper?!  How can a pack of construction paper contain NO brown?!  But I digress..)  I decided to make a left and a right, so there would be two turkeys on the finished craft.  Then I snipped out various colors of construction paper into basic feather shapes. Lily and Jack each chose a background color of paper, and I drew two dots to show them where they should glue their feathers.  I think if I had it to do over, I'd draw lines going out from the dot and tell them to put their feathers on the line.  It would just make it easier.  Anyway, they pasted down a few feathers for each turkey, and then I helped them to glue their handprint on top.  We added beaks and google eyes, and they each drew little turkey legs.

With a little more prep beforehand (cutting out the feathers, getting the google eyes etc) this craft would have gone more smoothly.  But I was happy with how it turned out, and the kids got their turkey craft. :)


Wednesday, October 26, 2011

Gingerbread Math


This is a great game for counting skills, basic math facts and number identification.  There isn't a printable version of the gingerbread man on the site, but I made my own pretty quickly by copying a gingerbread template and then adding my own numbers.  I did 2-12 so that my kids could use two dice and practice not just counting the dots on one die, but also adding together the dots from two.  (They still count the dots, but then I reinforce the basic math facts by saying, "Four on one die plus three on the other equals seven.")

When the child rolls a particular number, he or she marks it off on the gingerbread man.  (You can use a dot marker, but I just had the kids color over it.)  I put three of each number on the paper to keep the game going.  However, I've found that the kids tire of the game after a few rounds, so next time I may just put one of each number on there.  I think my kids will enjoy it more as they get older.


Sunday, October 23, 2011

Magnetic Letters and Sight Words


I'm always looking for fun ways to use our magnetic letters.  It can be great to use the fridge, but moving the letters to a roasting pan has renewed the kids' interest in them.  I used the sight word cards I'd made for the clothespin spelling game. Because we have upper and lowercase letters, the words can have up to two of the same letter in them.  The kids end up reading the word, then focusing on the individual letters, and reading the word again.  Great practice!

Dot/Number matching


More fun with clothespins! I love how it helps with fine motor skill practice and dexterity while giving the kids time with math work. They are LOVING clothespins!  


For this activity, I just used a piece of card stock and drew 10 rectangles, and then drew numbers 1-10 on clothespins.  The original post had the dots (or snowflakes) in a circle divided in ten pie pieces, but I decided to make it a little easier but just using the rectangular shape.  

The only negative was that some of the clothespins were upside down when you pinned them on, so I ended up cutting this down the center lengthwise.  Now I have two strips and all of the clothespin numbers are right-side-up. 


Saturday, October 22, 2011

Spelling with Clothespins


This is a great activity because it gives the kids a little fine motor skills practice while playing with spelling.   I made a little pile of sight words on cardstock and printed letters on clothespins.  (One of each consonant and a few of each vowel, though you really only need one of each to start.)  

At first I just had the clothespins spread out on the floor, but then I printed the alphabet on cardstock and we clipped the clothespins to that first to make them easier to find.  I think that helped a lot.


Great practice at sounding out words, identifying letters, putting them in order...and lots of fun!

Friday, October 21, 2011

Counting box

Original Post


Pin

The original version of this game focuses on fine motor skills.  The children use tweezers to pick up beads and put them in the carton.  I plan to add that to this activity in the future, but for now I just used it as a counting game. 


The kids put one bead in #1, two in #2, and so on.  I didn't have enough for them to keep all of the bead in there as the numbers got higher; I plan to add some beads so that they can do it that way.